• Home
  • Recipes
  • About
  • Contact
  • PRESS
Menu

The dessert project

Street Address
City, State, Zip
Phone Number
Playing with sugar

Your Custom Text Here

The dessert project

  • Home
  • Recipes
  • About
  • Contact
  • PRESS

Cherry muffins with crumble

June 20, 2016 Gayatri
IMG_0159.jpg
muffins edited
muffins edited
final.IMG_0009
final.IMG_0009
final.IMG_0088
final.IMG_0088

I know. I know that June in delhi has very few perks. Sweaty evening walks to Khan Market to get a scoop of lemon frozen yogurt at

Big Chill

is one. Sitting with your face in front of a box Air Conditioner is another. And there’s very few others among them. BUT somewhere between the sweltering heat and sunburn and pre-monsoon humidity, there’s a teeny tiny silver lining and it is called stone fruit! YAYY mangoes, coconut, lychees, apricots, cherry, peaches - summer is definitely the season of the fruit. For me, it’s easy to pick a favourite. There’s nothing better than gorgeous fresh cherries! And also can we take a moment to acknowledge that cherries are probably the CUTEST fruit? Think about the

cherry emoji

or how people use the phrase ‘with a cherry on top’ to imply something extra special.

.

But don’t be deceived. They may be tiny and cute but pitting cherries is MESSY stuff. You may want to swap any summer whites and pastels for your raggedy clothes or be prepared to sport cherry stained outfits all summer. You can pit cherries using a cherry pitter or just a basic knife and I promise it’s totally worth the mess.

.

I baked cherry muffins with almond crumble a couple of times this summer and they were gone within the hour. They’re essentially vanilla muffins with a surprise cherry filling and a crunch almond-y crumble on top. They’re so good and they can make a delicious breakfast or evening snack. Cherry muffin + iced coffee , and you may have just created a june breakfast staple. Atleast for the couple of short weeks cherries are in season!

.

final.IMG_9995
final.IMG_9995
final.IMG_9985
final.IMG_9985

.

Here’s the

recipe

:

.

Ingredients: 

.

Muffin: 

.

1 cup flour + 2 tbsp cornflour + 2 tsp b powder + 1/2 tsp b soda + 1/4 tsp salt 

100 g butter 

2 eggs 

2/3 cup sugar 

1/3 cup cream 

1 tsp vanilla essence 

.

Filling: 

.

1 1/2 cup cherries, pits removed 

2 tbsp brown sugar 

2 tbsp butter 

2 tbsp lemon juice 

.

Crumble: 

.

3 tbsp flour 

3 tbsp cornflour 

2 tbsp almond meal 

2 tbsp cold butter 

2 tbsp brown sugar 

.

Start with the cherry filling. 

Put 1 1/2 cups of cherries (with the pits removed) in a saucepan. Add the butter, brown sugar and lemon juice and cook on low-medium heat for about 5 - 7 minutes. 

Allow it to cool.  

.

To make the muffin, preheat the oven to about 180˚. Prepare a cupcake pan with 6 muffin liners. 

The easiest way is to simply mix all the ingredients except the cream in a large bowl using an electric mixer. 

When a smooth batter is formed, gradually add the cream and continue beating. 

.

For the crumble, mix the butter, brown sugar, flour, cornflour and almond meal in a bowl. Use your fingers to mix until a grainy mixture is formed. 

.

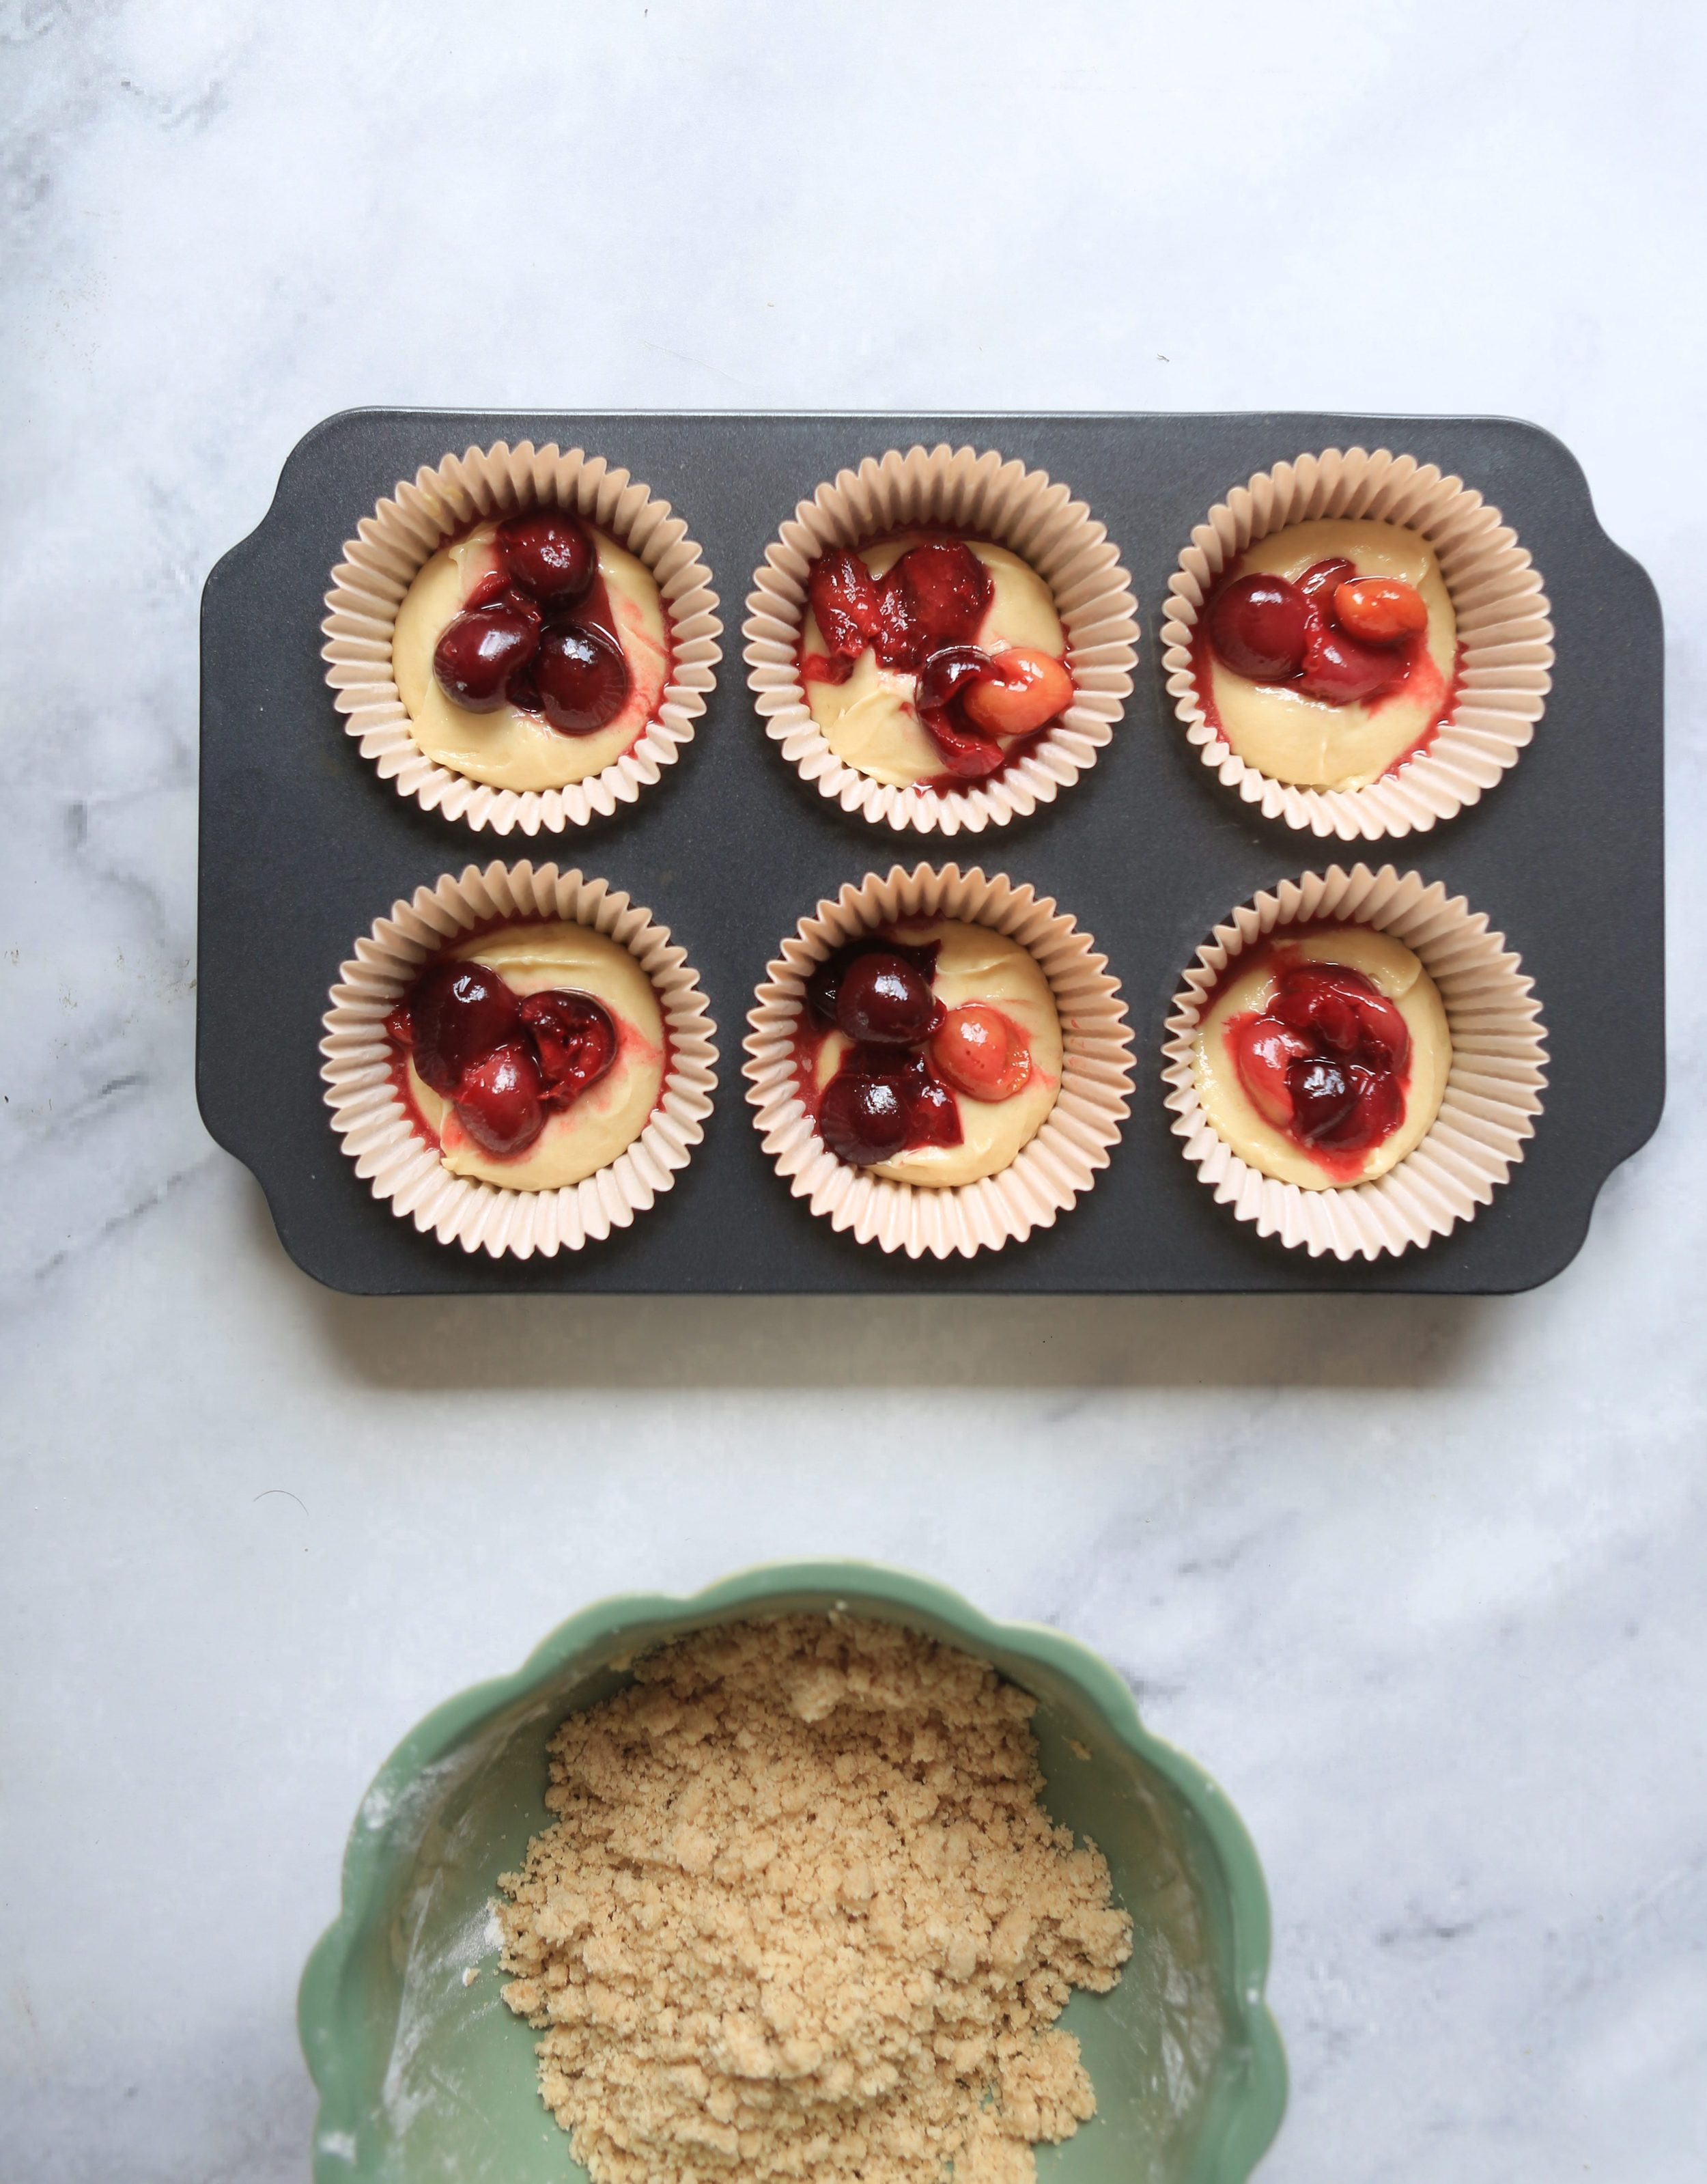
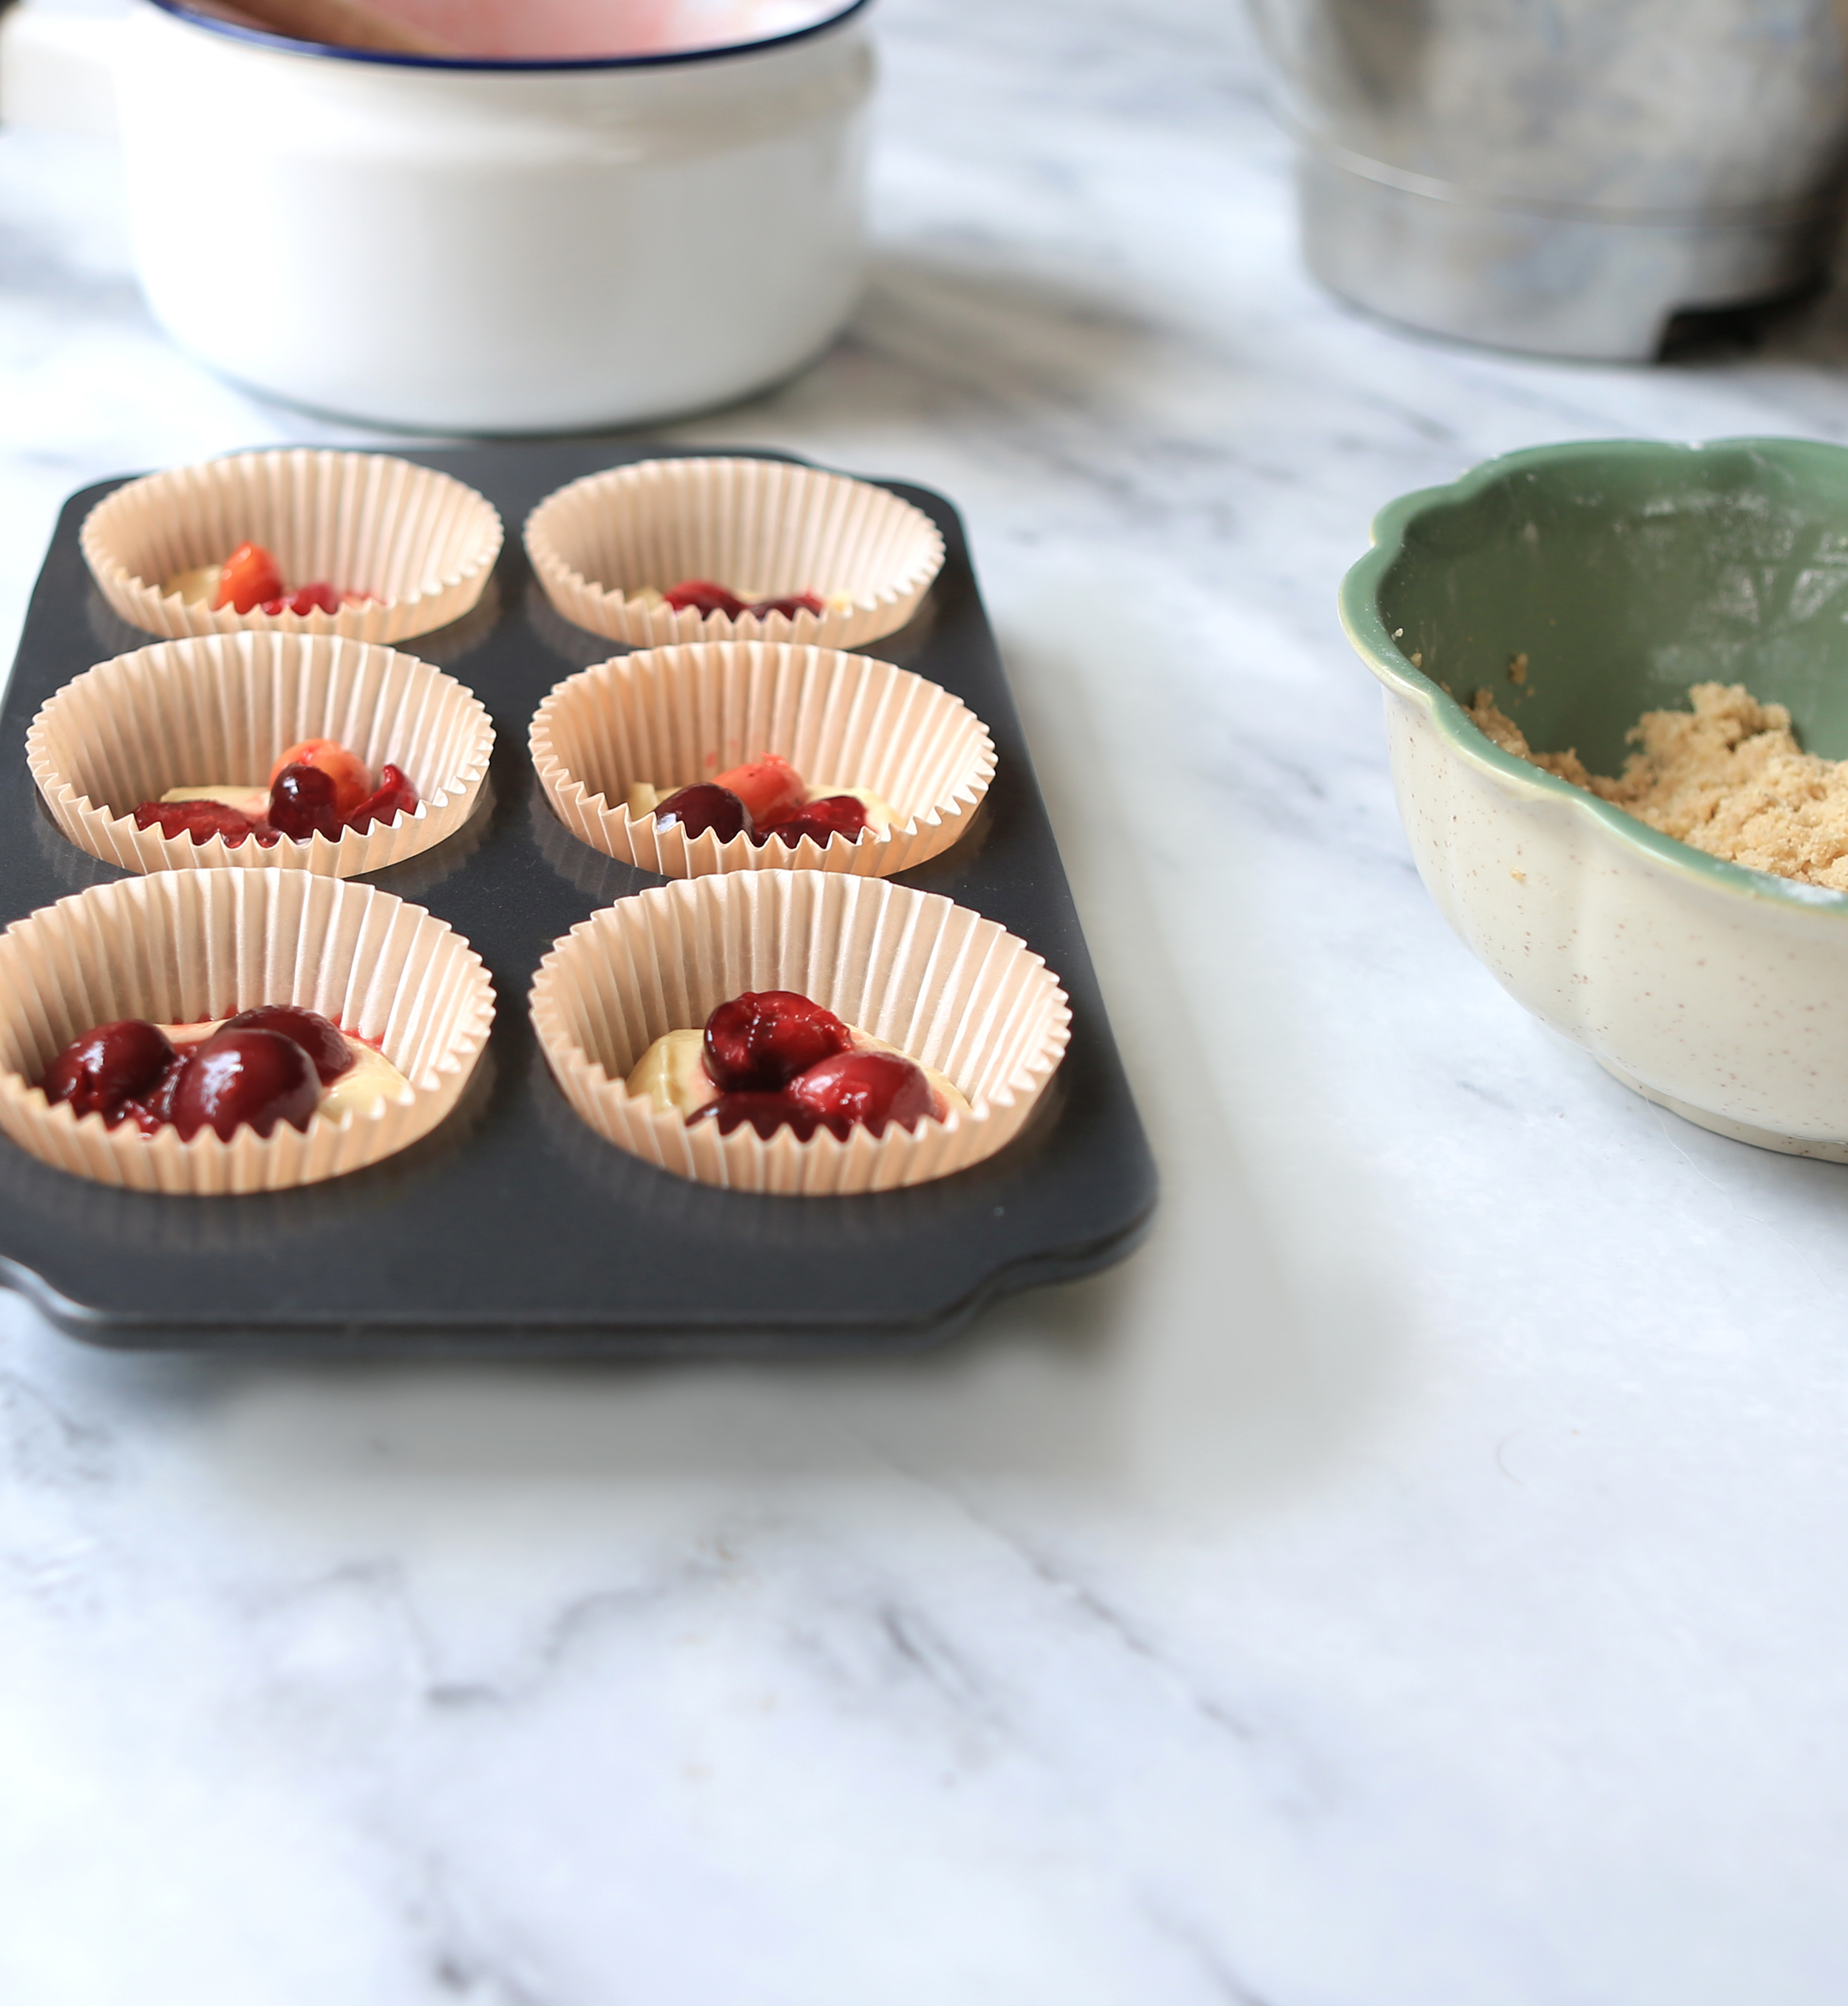
Fill the muffin liners till about 1/4th with the batter. Then add a generous tablespoon of the cherry filling, then top with more muffin batter. 

Lastly add the crumble topping

.

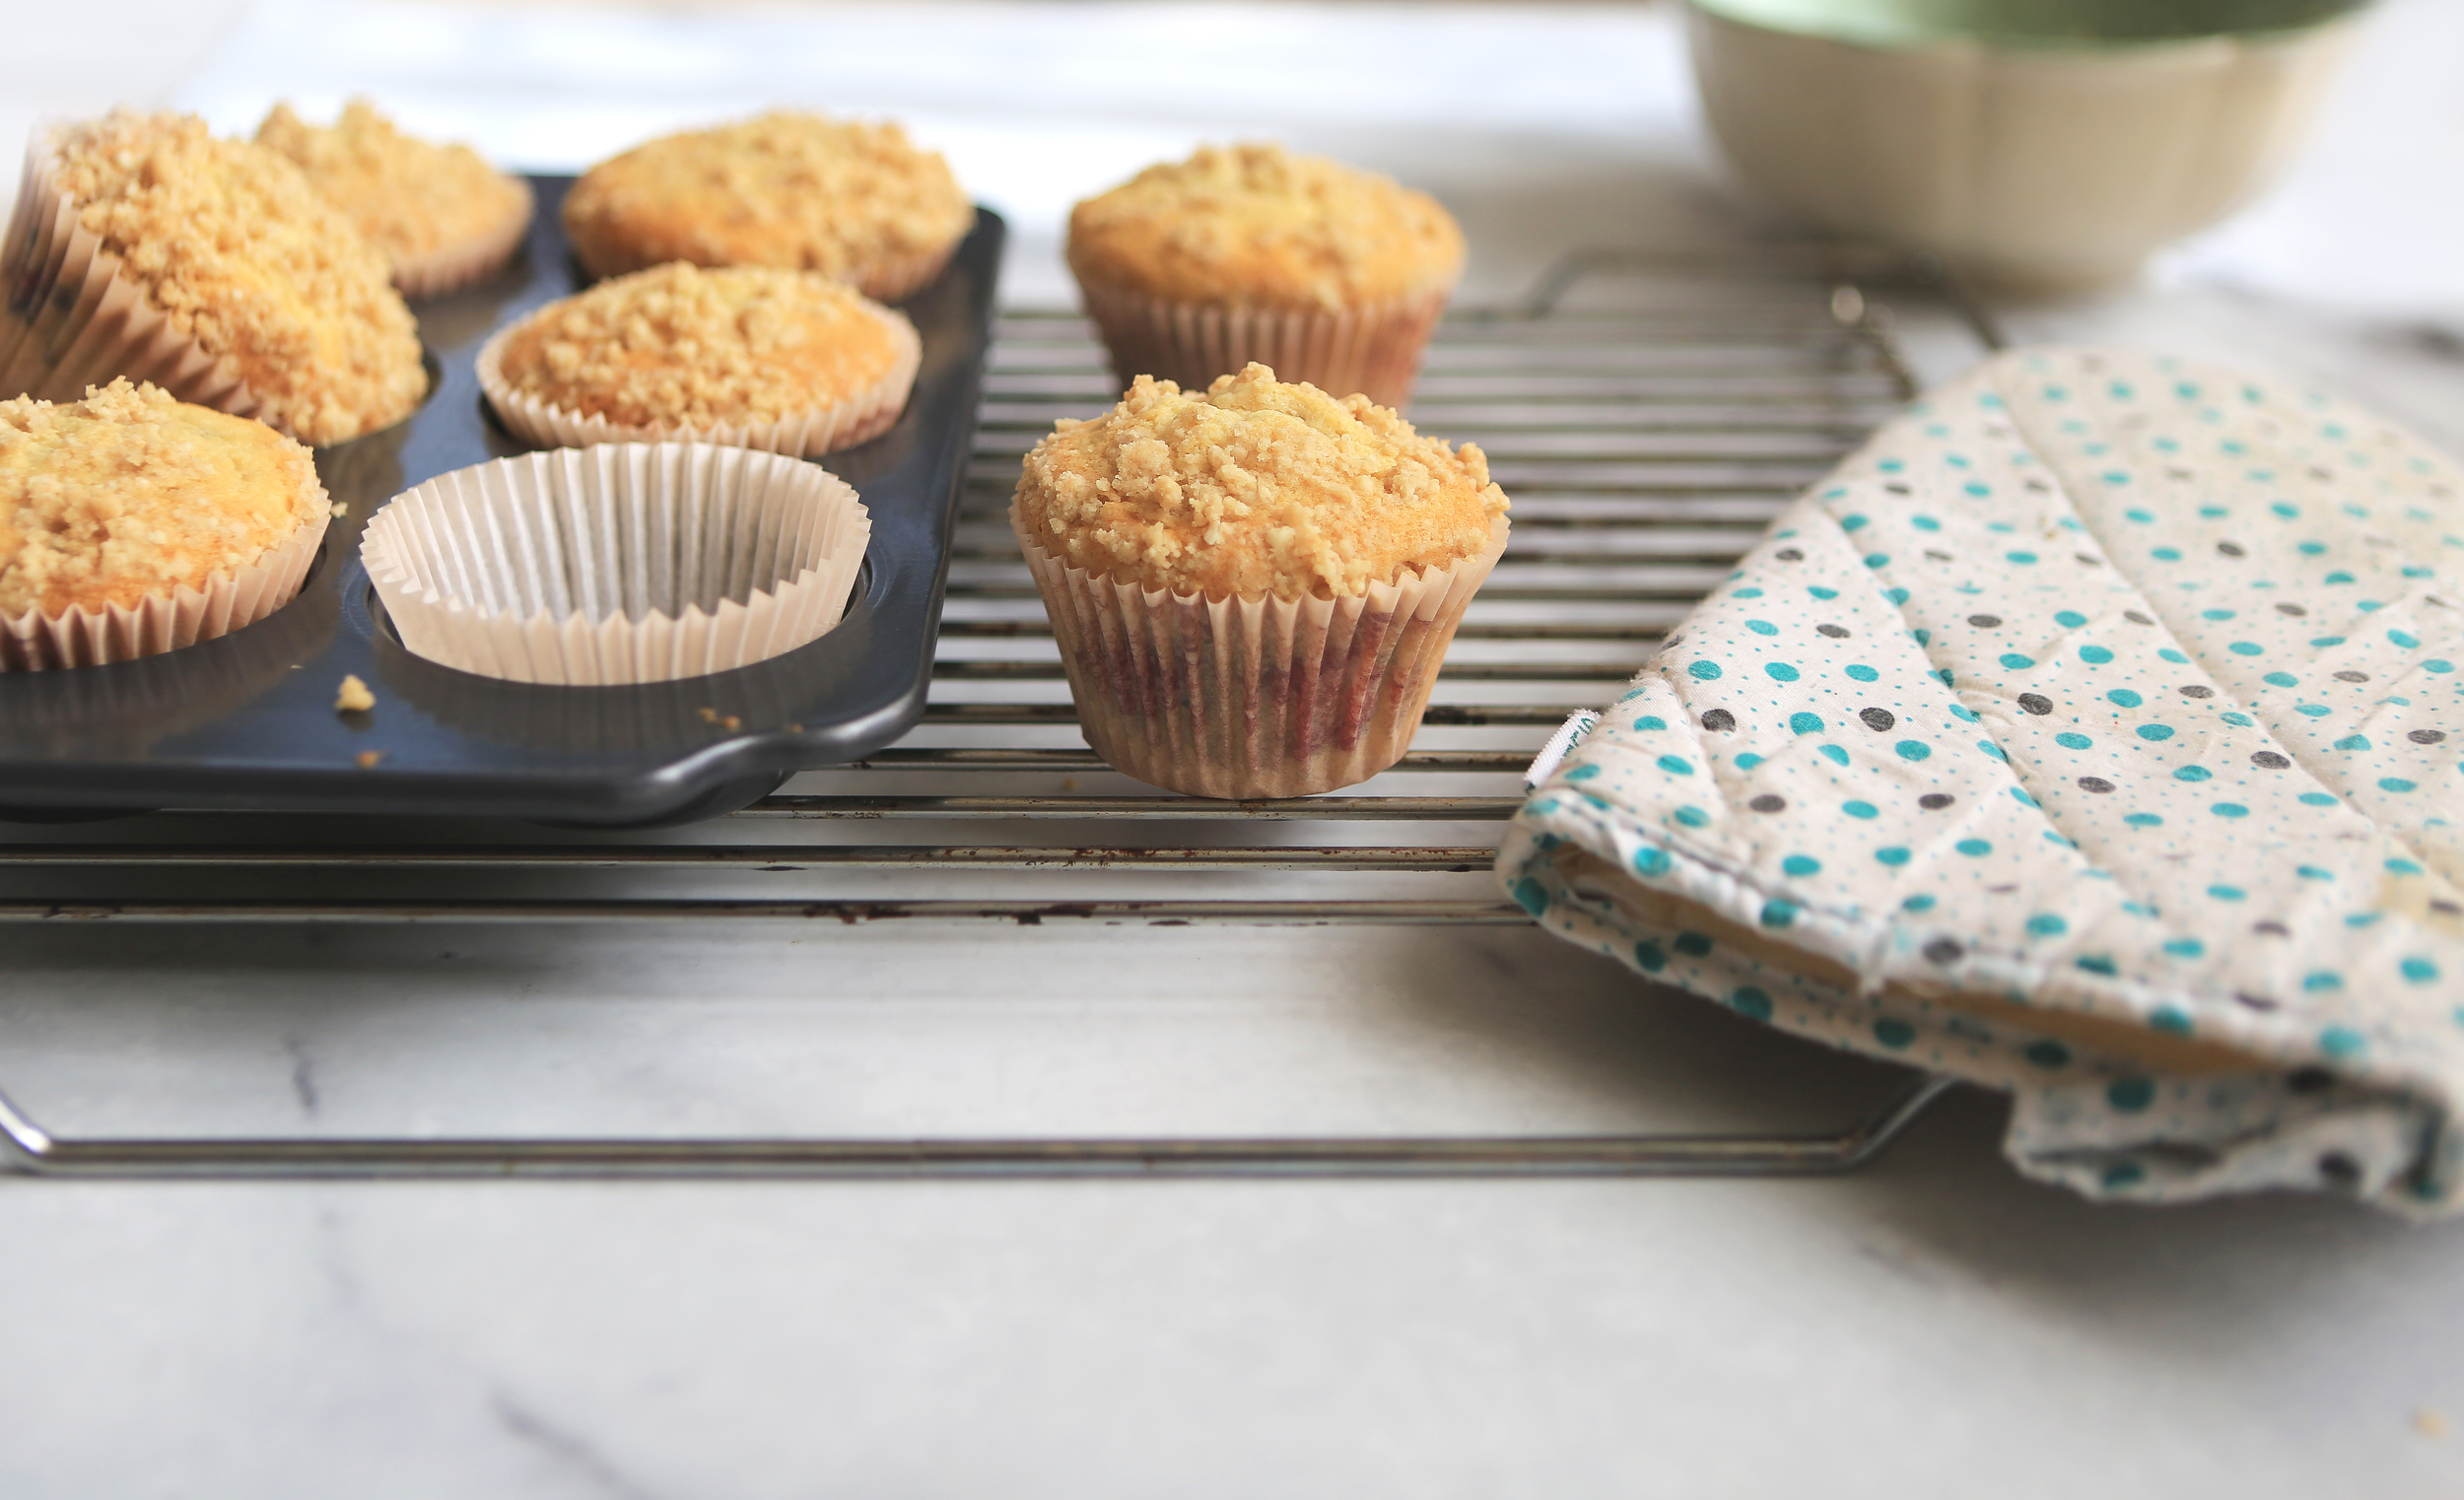
Bake for about 20 - 25 minutes of until a cake tester comes out clean. 

.

Let the muffins cool for about 30 minutes. 

.

Serve plain or with cream/ vanilla ice cream. 

In Recipes Tags amazing, blog, cake, cherry, cupcakes, dessert blog, favourite, Food, food blog, food bloggers in delhi, food bloggers in india, food photography, food styling, foodie, fruit, india, indian blog, muffin recipe, muffins, photography, recipe, recipe blog, recipes for miuffins, sweet, sweet dish, writing, yummy
4 Comments

red velvet cake

December 19, 2015 Gayatri
afinal.IMG_3620.jpg

Hi guys ! Hows everyone’s weekend going ? If you’re having a typical Saturday, battling a hangover like I am, I feel you.

What is your hangover dealing routine ? Is it a shower, a workout, a giant cup of coffee ?

My standard go-to hangover routine is French fries and coffee, arguably a strange combination but somehow it does the trick. Anyway, today I swapped the French fry ritual with a giant slice of red velvet cake, and it was like comfort on a plate. If comfort was red and slathered with cream cheese.

I’ve been making red velvet cake for a while now, way before I started really baking and thought there was something cool about it. But the truth about red velvet is that its just a light cocoa sponge with red food colouring. But but but, sandwich some cream cheese frosting between the layers and you have yourself a pretty delicious cake!

afinal.IMG_3662
afinal.IMG_3662
IMG_2031
IMG_2031

Also, I recommend a layer of frosting for every half inch layer of cake. In this particular cake, frosting is everything, and for it to be the really delicious creamy, soft spongy cake that you imagine it to be, the frosting to cake ratio needs to be perfect. So I make 2 layers in 2 separate cake pans and then slice each layer into half, making it a 4 layer cake. So that increases the surface area for the frosting so it can be really generously put into the cake.

Okay im done being scientific/mathematical about things, I had a moment of nerdiness and its over now.

IMG_2028
IMG_2028

Here’s how to make a kickass red velvet cake (adapted from Joy of Baking, Ritu Dalmia's cookbook and the Epicurious - experts on experts on experts)

CAKE:

250 grams sifted flour + baking powder + baking soda

1/2 teaspoon salt

20 grams cocoa powder

115 gm unsalted butter softened

300 gm granulated white sugar

2 large eggs

1 teaspoon pure vanilla extract

240 ml buttermilk

3 tablespoons liquid red food coloring*

1 teaspoon white vinegar

1 teaspoon baking soda

FROSTING:

1 ½ Pkt Philadelphia cream cheese

60gm butter

120 gm icing sugar

1 tsp vanilla extract

Preheat oven to 180˚ C. Butter two 8 inch round cake pans and line the with parchment paper (Very important!) . Set aside.

In a bowl sift the flour, salt, and cocoa powder, baking powder and baking soda. Set aside.

In another bowl, beat the butter and sugar until light and fluffy (about 3 minutes), using an electric mixer. The mix should now look pale yellow, almost white.

Add the eggs, one at a time and beat. Add the vanilla extract and beat until combined. Scrape down the sides with a spatula.

In a cup, whisk the buttermilk with the red food coloring

*(amount of food colouring varies a little, depending on the brand you use. You want to add enough so that the buttermilk mixture is a strong red.)

Alternately add the flour mixture and buttermilk to the mixture, folding continuously. (basically add the flour mix, then buttermilk, then flour mix again, then all the rest of the buttermilk, then flour mix again until all of it is combined)

In a small cup combine the vinegar and baking soda. It will fizz a little. Add to the cake mixture and immediately fold.

Divide the batter evenly between the two cake tins. Bake for approximately 30 minutes or until a cake tester inserted into the center comes out clean. Let the cakes cool at room temperature and then wrap in cling plastic and refrigerate the layers for about 30 minutes.

Meanwhile, get on the frosting.

Cut the Philadelphia Cream Cheese and butter into cubes and whisk using an electric mixer. Add the icing sugar spoon by spoon, whisking throughout.

To assemble:

Slice each cake layer in half, down the middle, using a serrated knife, so you now have 4 equal layers.

Generously frost the first layer with the cream cheese frosting and neatly place the next layer on top. Repeat.

When all layers are frosted, frost the top and sides with a thin layer of icing. Then refrigerate the cake for about 15 minutes.

Lastly, take out the cake from the fridge, and use all the leftover frosting to frost the rest of the cake.Dust with red cake crumbs.

EAT !

In Recipes Tags blog, cake, colour, cute, delhi, delicious, Food, food lover, food photography, food styling, foodie, foodies, india, love, photography, red, red velvet cake, yummy
1 Comment

Classic Hot Chocolate (with video!)

December 1, 2015 Gayatri
final.hotchocIMG_1560.jpg

It’s snuggle season guys – I don’t know about you but Delhi winter is my favourite time of the year. (I have been talking about the weather an awful lot haven’t i). The city is heavy with festivity, string lights, music and basically just good cheer and while whether that compensates for the traffic and smog is debatable, let’s at least acknowledge that festive season means we are officially allowed to eat as much comfort food as we want , GUILT NO BAR! Seriously – they even have a term for it – Holiday Weight. It is totally one hundred per cent legit, so toss your guilt in a box with your flip flops and shorts and label it ‘things I don’t have to deal with until summer’. ‘Nuff said. Anyway, nothing says COMFORT FOOD like hot chocolate in the winter amirite? Besides which, I am a strong proponent of the idea that chocolate really deserves as much attention, research and experimentation as is possible

Alice Medrich says that hot chocolate need not necessarily be the richest, thickest and creamiest because that steals attention from the flavour of chocolate – she recommends chocolate with milk and water (water!!) , but didn’t we grow up on a cup of creamy and milky hot chocolate loaded with thick whipped cream, and marshmallows and chocolate sauce ? So the dilemma is - what’s the real hot chocolate ?

[embed]https://vimeo.com/153621987[/embed]

final.hotchoc2IMG_1544.jpg

Search #ProjectXHotChocolate on the blog and on Instagram (for sneak peaks) this whole winter to follow my experiments with hot chocolate, more theories (LOL), snuggly winter stories and some kickass recipes.

BUT FIRST – here’s my recipe of Classic Hot Chocolate – I swear by it.

  1. Melt 25 gm of dark chocolate pieces (I use Ghiradelli 60 % cocoa) in saucepan, with 1 ½ tbsp. cocoa powder and ½ cup of milk. Stir over low heat until completely mixed and smooth.
  1. Now remove from heat and add another ½ cup hot milk, 1 ½ tbsp sugar and 1/8th tsp salt.
  1. Stir for about 2 -3 minutes until fully combined and frothy.
  1. Whisk together some heavy cream and sugar to make your own whipped cream and dollop a spoonful on top.
  1. Add a light sprinkle of dark chocolate shavings.

And TA-DAAAA!! The perfect hot chocolate.

More soon xxxx

In Recipes Tags amazing, baker, baking, bread, cake, Cakes, chef, chocoholics, chocolate, cocoa, cook, cooking, cozy, delhi food blogger, Dessert, dessert blog, drinks, eat, eating, food photography, food styling, foodies, hot chocolate, india, love, new delhi, nigella, Party, photography, ProjectXHotChocolate, recipe, recipes, style, taste, tasty, winter
1 Comment
← Newer Posts Older Posts →
Hello - welcome to the dessert project, where I bake, eat, photograph, experiment and basically play around with all things sweet! Thanks for stopping by and shoot me a message if you'd like to chat! x

Hello - welcome to the dessert project, where I bake, eat, photograph, experiment and basically play around with all things sweet! Thanks for stopping by and shoot me a message if you'd like to chat! x

INSTAGRAM

👀
Cupcake dreams 💭
Hardest goodbye
Brownie tower
Why choose between brownies and cheesecake when you can have both. Yolo
Made cheesecake brownies with my leftover ingredients ! Thank you for all the suggestions you guys sent 🙏🏽🙏🏽

Powered by Squarespace